# 本节课重点内容
# Why WebGL / Why GPU?
- WebGL 是什么?
- GPU ≠ WebGL ≠ 3D
- WebGL 为什么不像其他前端技术那么简单?
# 现代的图像系统
- 光栅 (Raster):几乎所有的现代图形系统都是基于光栅来绘制图形的,光栅就是指构成图像的像素阵列。
- 像素 (Pixel):一个像素对应图像上的一个点,它通常保存图像上的某个具体位置的颜色等信息。
- 帧缓存 (Frame Buffer):在绘图过程中,像素信息被存放于帧缓存中,帧缓存是一块内存地址。
- CPU (Central Processing Unit):中央处理单元,负责逻辑计算。
- GPU (Graphics Processing Unit):图形处理单元,负责图形计算。
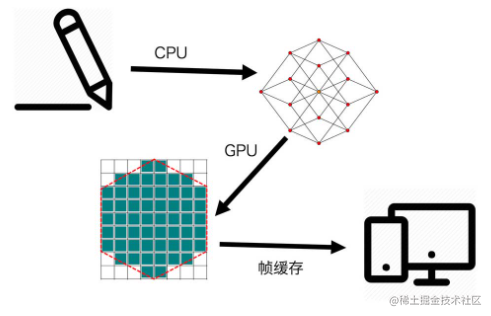
- 如上图,现代图像的渲染如图过程
- 轮廓提取 /meshing
- 光栅化
- 帧缓存
- 渲染
# The Pipeline
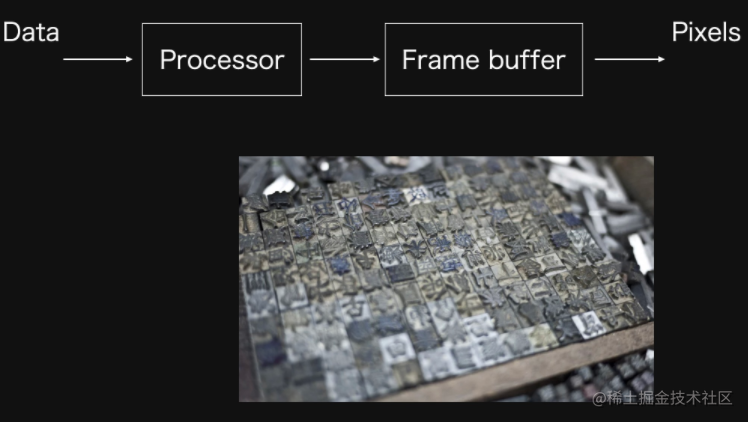
# GPU
- GPU 由大量的小运算单元构成
- 每个运算单元只负责处理很简单的计算
- 每个运算单元彼此独立
- 因此所有计算可以并行处理
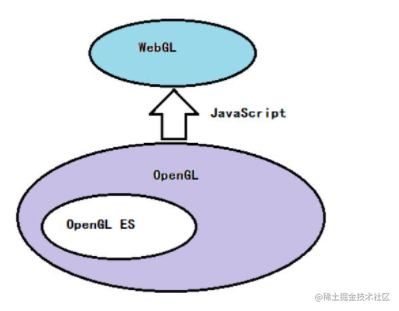
# WebGL & OpenGL 关系
OpenGL, OpenGL ES, WebGL, GLSL, GLSL ES API Tables (umich.edu)
# WebGL 绘图步骤
步骤
- 创建 WebGL 上下文
- 创建 WebGL Program
- 将数据存入缓冲区
- 将缓冲区数据读取到 GPU
- GPU 执行 WebGL 程序,输出结果

如图,针对几个单词进行解释:
- Raw Vertices & Primitives 原始顶点 & 原语
- Vertex Processor 顶点着色器
- 运算后送到 片元着色器 进行处理:Fragment Processor
# 创建 WebGL 上下文
const canvas = document.querySelector('canvas'); | |
const gl = canvas.getContext('webgl'); | |
// 创建上下文, 注意兼容 | |
function create3DContext(canvas, options) { | |
const names = ['webgl', 'experimental-webgL','webkit-3d','moz-webgl']; // 特性判断 | |
if(options.webgl2) names.unshift(webgl2); | |
let context = null; | |
for(let ii = 0; ii < names.length; ++ii) { | |
try { | |
context = canvas.getContext(names[ii], options); | |
} catch(e) { | |
// no-empty | |
} | |
if(context) { | |
break; | |
} | |
} | |
return context; | |
} |
# 创建 WebGL Program(The Shaders)
Vertex Shader(顶点着色器)
通过类型数组 position,并行处理每个顶点的位置
attribute vec2 position;//vec2 二维向量
void main() {
gl_PointSize = 1.0;
gl_Position = vec4(position, 1.0, 1.0);
}Fragment Shader(片元着色器)
为顶点轮廓包围的区域内所有像素进行着色
precision mediump float;void main() {
gl_FragColor = vec4(1.0, 0.0, 0.0, 1.0);// 对应 rgba(255,0,0,1.0),红色
}
其具体步骤如下:
创建顶点着色器和片元着色器代码:
// 顶点着色器程序代码const vertexShaderCode = `
attribute vec2 position;
void main() {gl_PointSize = 1.0;
gl_Position = vec4(position, 1.0, 1.0);
}
`;
// 片元着色器程序代码const fragmentShaderCode = `
precision mediump float;
void main() {gl_FragColor = vec4(1.0, 0.0, 0.0, 1.0);
}
`;
使用
createShader()创建着色器对象使用
shaderSource()设置着色器的程序代码使用
compileShader()编译一个着色器// 顶点着色器const vertexShader = gl.createShader(gl.VERTEX_SHADER);
gl.shaderSource(vertexShader, vertex);
gl.compileShader(vertexShader);
// 片元着色器const fragmentShader = gl.createShader(gl.FRAGMENT_SHADER);
gl.shaderSource(fragmentShader, fragment);
gl.compileShader(fragmentShader);
使用 **
createProgram()** 创建WebGLProgram对象使用
attachShader()往WebGLProgram添加一个片段或者顶点着色器。使用 **
linkProgram()** 链接给定的WebGLProgram,从而完成为程序的片元和顶点着色器准备 GPU 代码的过程。使用
useProgram()将定义好的WebGLProgram对象添加到当前的渲染状态// 创建着色器程序并链接const program = gl.createProgram();
gl.attachShader(program, vertexShader);
gl.attachShader(program, fragmentShader);
gl.linkProgram(program);
gl.useProgram(program);
# 将数据存到缓冲区中(Data to Frame Buffer)
- 坐标轴:webGL 的坐标系统是归一化的,浏览器和 canvas2D 的坐标系统是以左上角为坐标原点,y 轴向下,x 轴向右,坐标值相对于原点。而 webGL 的坐标系是以绘制画布的中心点为原点,正常的笛卡尔坐标系。
通过一个顶点数组表示其顶点,使用 createBuffer() 创建并初始化一个用于储存顶点数据或着色数据的 WebGLBuffer 对象并返回 bufferId ,然后使用 bindBuffer() 将给定的 bufferId 绑定到目标并返回,最后使用 ** bufferData() **,将数据绑定至 buffer 中。
// 顶点数据 | |
const points = new Float32Array([ | |
-1, -1, | |
0, 1, | |
1, -1, | |
]); | |
// 创建缓冲区 | |
const bufferId = gl.createBuffer(); | |
gl.bindBuffer(gl.ARRAY_BUFFER, bufferId); | |
gl.bufferData(gl.ARRAY_BUFFER, points, gl.STATIC_DRAW); |
# 读取缓冲区数据到 GPU(Frame Buffer to GPU)
getAttribLocation() 返回了给定
WebGLProgram对象中某属性的下标指向位置。vertexAttribPointer() 告诉显卡从当前绑定的缓冲区(bindBuffer () 指定的缓冲区)中读取顶点数据。
enableVertexAttribArray() 可以打开属性数组列表中指定索引处的通用顶点属性数组。
const vPosition = gl.getAttribLocation(program, 'position'); // 获取顶点着色器中的 position 变量的地址 | |
gl.vertexAttribPointer(vPosition, 2, gl.FLOAT, false, 0, 0); // 给变量设置长度和类型 | |
gl.enableVertexAttribArray(vPosition); // 激活这个变量 |
# 输出结果(Output)
Output
drawArrays() 从向量数组中绘制图元
// output | |
gl.clear(gl.COLOR_BUFFER_BIT); // 清除缓冲的数据 | |
gl.drawArrays(gl.TRIANGLES, 0, points.length / 2); |
# WebGL 太复杂?其他方式
# canvas 2D
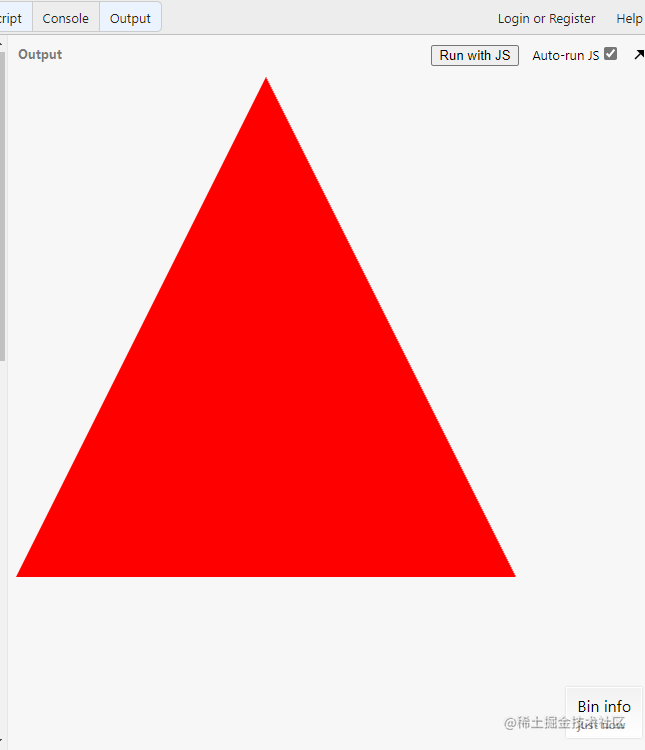
看看人家 canvas2D,绘制同样的三角形:
//canvas 简单粗暴,都封装好了 | |
const canvas = document.querySelector('canvas'); | |
const ctx = canvas.getContext('2d'); | |
ctx.beginPath(); | |
ctx.moveTo(250, 0); | |
ctx.lineTo(500, 500); | |
ctx.lineTo(0, 500); | |
ctx.fillStyle = 'red'; | |
ctx.fill(); |
# Mesh.js
mesh-js/mesh.js: A graphics system born for visualization 😘. (github.com)
const {Renderer, Figure2D, Mesh2D} = meshjs; | |
const canvas = document.querySelector ('canvas'); | |
const renderer = new Renderer(canvas); | |
const figure = new Figure2D(); | |
figurie.beginPath(); | |
figure.moveTo(250, 0); | |
figure.lineTo(500,500); | |
figure.lineTo(0, 500); | |
const mesh = new Mesh2D(figure, canvas); | |
mesh.setFill({ | |
color: [1, 0, 0, 1], | |
}); | |
renderer.drawMeshes([mesh]); |
# Earcut
使用 Earcut 进行三角剖分
const vertices = [
    [-0.7, 0.5],
    [-0.4, 0.3],
    [-0.25, 0.71],
    [-0.1, 0.56],
    [-0.1, 0.13],
    [0.4, 0.21],
    [0, -0.6],
    [-0.3, -0.3],
    [-0.6, -0.3],
    [-0.45, 0.0],
];
const points = vertices.flat();
const triangles = earcut(points)
# 3D Meshing
由设计师导出给我们,再提取
SpriteJS/next - The next generation of spritejs.
# 图形变换(Transforms)
这就是数字图像处理相关的知识了(学过的都还回来了.jpg)
# 平移

# 旋转

# 缩放

# 线性变换(旋转 + 缩放)

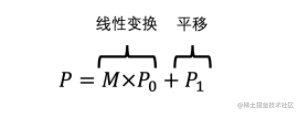
从线性变换到齐次矩阵

老师的又一个栗子:Apply Transforms
# 3D Matrix
3D 标准模型的四个齐次矩阵 (mat4)
- 投影矩阵 Projection Matrix(正交投影和透视投影)
- 模型矩阵 Model Matrix (对顶点进行变换 Transform)
- 视图矩阵 View Matrix(3D 的视角,想象成一个相机,在相机的视口下)
- 法向量矩阵 Normal Matrix(垂直于物体表面的法向量,通常用于计算物体光照)
# Read more
- The Book of Shaders (介绍片元着色器,非常好玩的)
- Mesh.js (底层库,欸嘿)
- Glsl Doodle (片元着色器的一个轻量库,有很多小 demo)
- SpriteJS (月影老师写的开源库 orz)
- Three.js(很多有意思的
游戏项目) - Shadertoy BETA(很多有意思的项目)
# 总结感想
这节课老师非常详尽的讲解了 WebGL 的绘图及其相关库,展示了很多有意思的 WebGL 小项目~
本文引用的大部分内容来自月影老师的课和 MDN!月影老师,tql!