# 前言及示例
事情是这样的,最近逐渐想把之前做过的一些交互特性和 webgl 相关的 demo 收集一下,写几篇博客进行记录,虽然还有很多不足,比如性能等都亟需优化,也欢迎各种指正。这是第一篇,下一篇是这个的基础上进行修改的另一个粒子系统。
第一个讲的是这个效果:Particles to Image,以下实践是在这个的基础上进行修改、重构得来的,有兴趣可以去看看原代码。
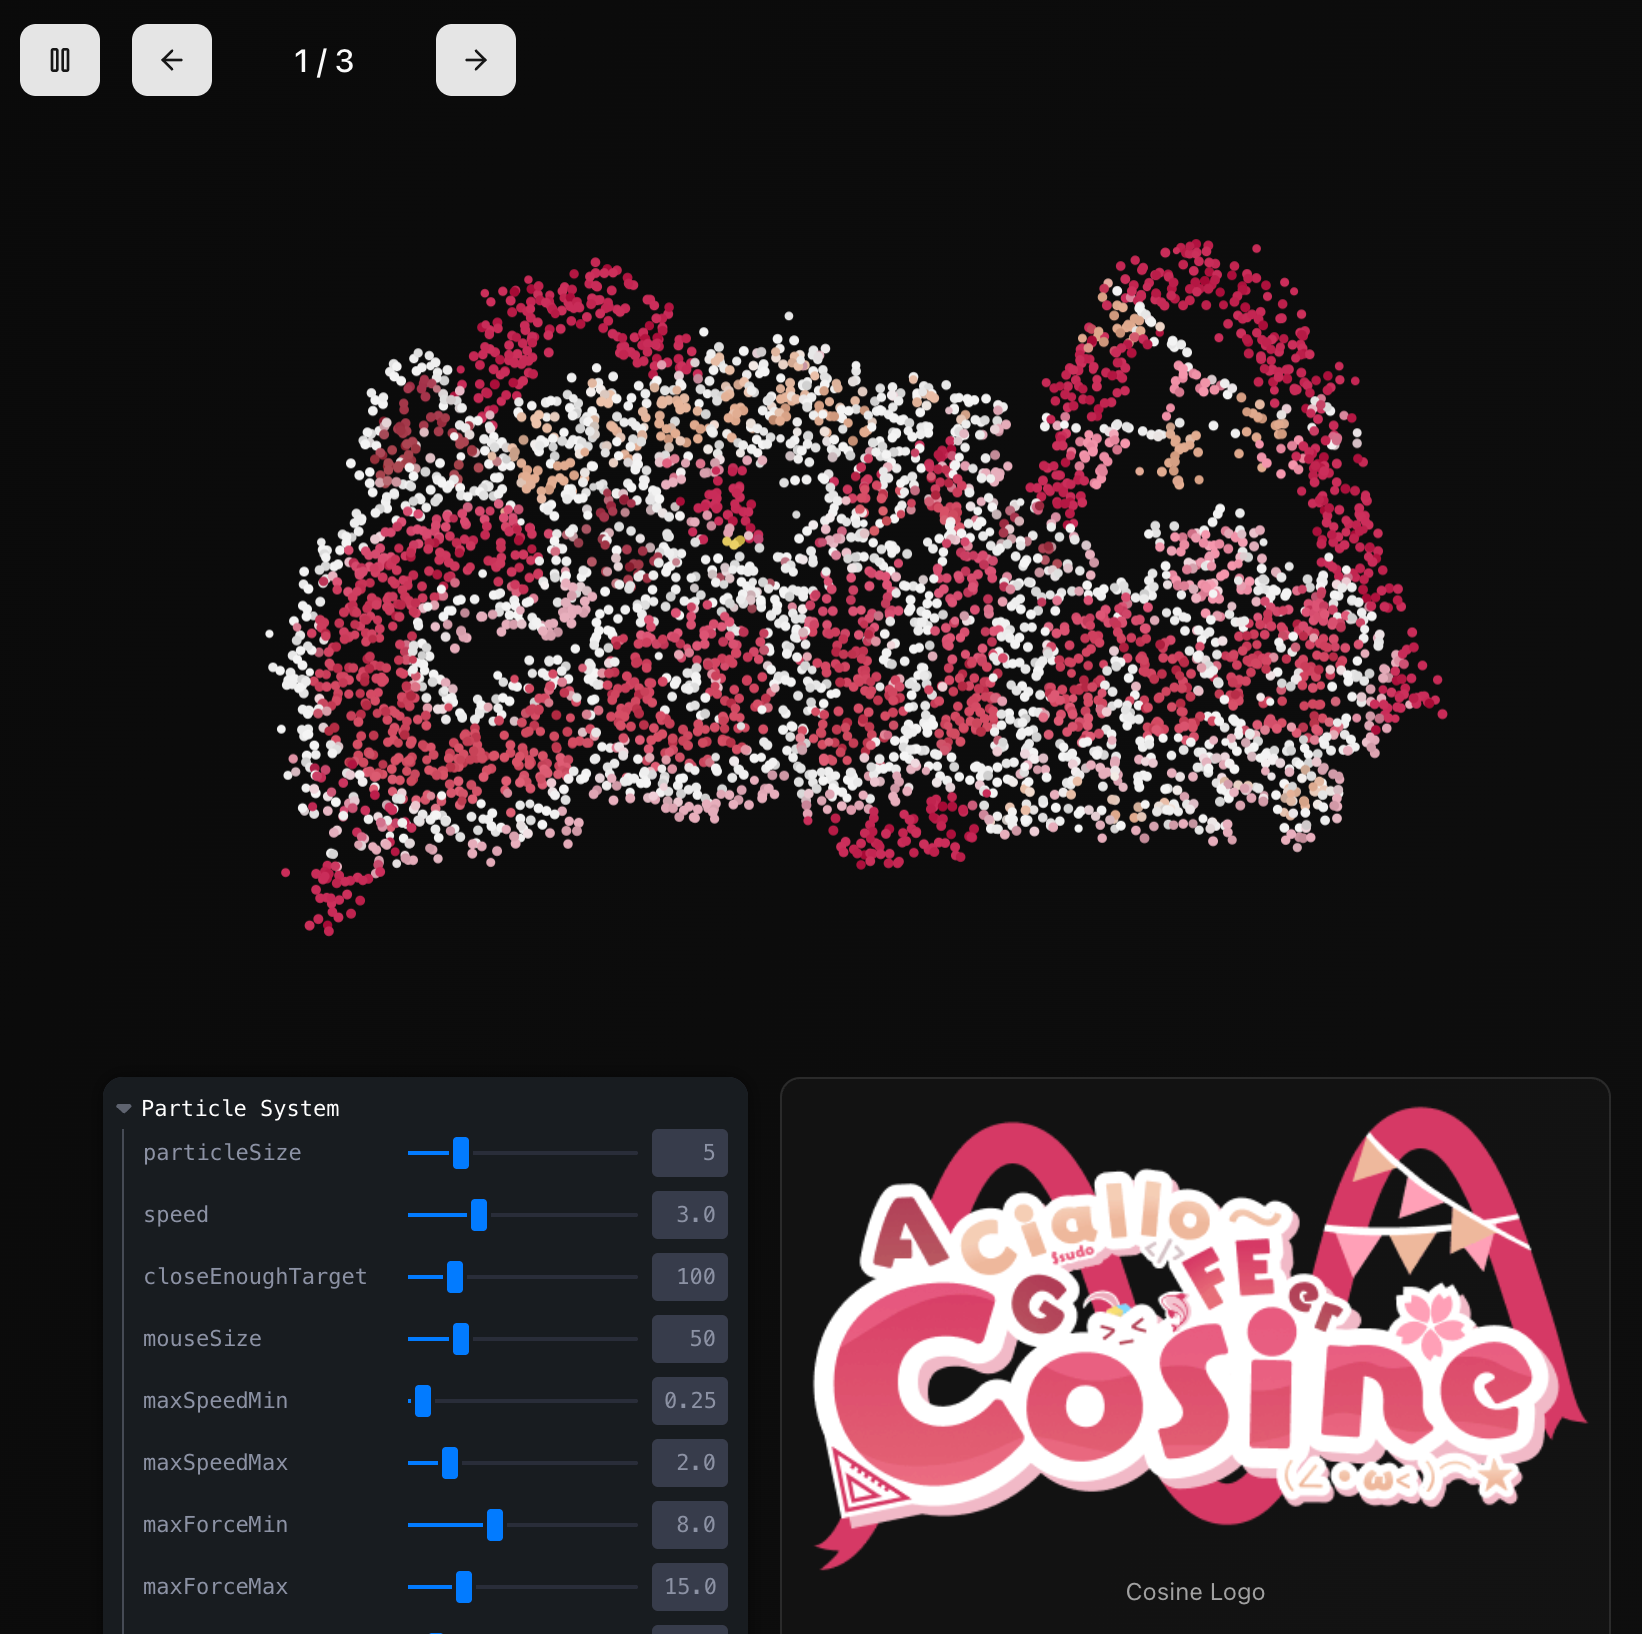
重构、移植到 react 和加入 ts 类型声明废了一些时间,还有一些细节的调整。移植后效果如下:
在线地址:https://p5-three-lab.vercel.app/examples
这篇博文和项目搭建写的都比较匆忙,有很多写的比较烂的地方,毕竟是为需求服务的,重构本身就比较赶,后续应该会不断完善。
部分段落有使用 AI 进行润色和辅助,虽然很 AI 但是通俗易懂就留着了(
# 思路与设计理念
这个动态粒子系统的核心思路是将静态图像转换为动态的粒子集合,每个粒子代表原图像中的一个像素点。通过物理模拟让粒子在不同图像之间平滑过渡,创造出富有生命力的视觉效果。
整个系统可以概括为四个关键阶段:
- 图像解构:将输入图像分解为像素数据,提取颜色和位置信息
- 粒子映射:为每个有效像素创建对应的粒子对象,建立图像与粒子的映射关系
- 物理模拟:实现粒子的运动规律,包括目标寻找、噪声扰动、鼠标交互等
- 寻径行为:粒子向目标位置移动
- 噪声扰动:添加 Perlin 噪声增加自然感
- 交互响应:鼠标悬停排斥,点击吸引
- 接近减速:临近目标时逐渐减速,避免震荡
- 渐进式渲染:通过颜色插值(
lerpColor)和大小过渡实现平滑的视觉效果,让图像切换显得自然流畅。
- 视觉重构:通过粒子的位置和颜色变化重新构建视觉效果,实现动态的图像表现
在 2D 库里,p5.js 相对来说是成熟的,在这种完全不需要 3D 的情况下,提供了丰富的图形和数学函数,如 loadPixels() 、 lerpColor() 、 P5.Vector 等,内置有向量类极大简化了向量计算
原代码通过 loadPercentage 和 resolution 参数控制粒子密度。
# 粒子系统架构总览与讲解
首先是系统的配置与类型定义,我们希望粒子切换的时候能够有过渡效果,并且可以通过 activeAnim 进行动画的暂停与继续。
export type MySketchProps = SketchProps & { | |
activeAnim: boolean; | |
imageIdx: number; // | |
id?: string; | |
particleConfig?: ParticleConfig; | |
}; | |
// 粒子配置接口 | |
type ParticleConfig = { | |
closeEnoughTarget: number; // 目标接近距离 | |
speed: number; // 移动速度 | |
mouseSize: number; // 鼠标影响范围 | |
scaleRatio: number; // 缩放比例 | |
particleSize: number; // 粒子大小 | |
maxSpeedRange?: [number, number]; // 最大速度范围 | |
maxForceRange?: [number, number]; // 最大力范围 | |
colorBlendRate?: [number, number]; // 颜色混合率 | |
noiseScale?: number; // 噪声缩放 | |
noiseStrength?: number; // 噪声强度 | |
}; |
# 1. 图像预处理与像素采样
首先对输入图像进行预处理,包括尺寸调整和像素数据提取:
p5.preload = () => { | |
for (let i = 0; i < sourceImgInfos.length; i++) { | |
const img = p5.loadImage(sourceImgInfos[i].url); | |
const [width, height] = sourceImgInfos[i]?.resize ?? [0, 0]; | |
const scaleNum = sourceImgInfos[i]?.scaleNum ?? defaultConfig.scaleNum; | |
if (width && height) { | |
img.resize(width * scaleNum, height * scaleNum); | |
} else { | |
img.resize(img.width * scaleNum, img.height * scaleNum); | |
} | |
sourceImgs.push(img); | |
} | |
}; |
关键是 p5.loadImage 这一步,会返回 p5.Image 对象。这个对象中含有 loadPixels 方法,将图像中每个像素的当前值加载到 img.pixels 数组,我们接下来会用到。
其他注意事项:需要根据设备类型(移动端 / 桌面端)动态调整图像尺寸,移动端性能不高,所以 scaleNum 和图片 resize 大小都需要进行调整,平衡视觉效果与性能,如果原图太大,则需要缩小再进行 loadImage, 生成的结果再进行放大。
# 2. 图像切换 setImageIdx
图像切换部分负责将图像的像素数据转换为粒子的目标位置和颜色。下面我们深入分析每个关键步骤,先看这块的完整代码:
function setImageIdx(idx: number) { | |
// 1. 参数解构与默认值处理 | |
const { | |
loadPercentage = defaultConfig.loadPercentage, // 粒子加载密度 (默认: 0.0007) | |
resolution = defaultConfig.resolution, // 分辨率倍数 (移动端: 15, 桌面端: 5) | |
} = sourceImgInfos[idx] ?? {}; | |
const sourceImg = sourceImgs[idx]; | |
// 2. 图像像素数据加载 | |
sourceImg.loadPixels(); | |
// 3. 对象池初始化 | |
const preParticleIndexes = allParticles.map((_, index) => index); | |
// 4. 随机采样阈值预计算 | |
const randomThreshold = loadPercentage * resolution; | |
// 5. 像素遍历与粒子分配 | |
for (let y = 0; y < imgHeight; y++) { | |
for (let x = 0; x < imgWidth; x++) { | |
// 6. RGBA 像素数据读取 | |
const pixelR = sourceImg.pixels[pixelIndex++]; | |
const pixelG = sourceImg.pixels[pixelIndex++]; | |
const pixelB = sourceImg.pixels[pixelIndex++]; | |
const pixelA = sourceImg.pixels[pixelIndex++]; | |
// 7. 透明度过滤优化(若 alpha 值小于 128,我们认为它是透明的,则跳过这个粒子) | |
if (pixelA < 128) continue; | |
// 8. 随机采样控制粒子密度,决定是否将粒子分配给该像素。 | |
if (p5.random(1.0) > randomThreshold) continue; | |
const pixelColor = p5.color(pixelR, pixelG, pixelB); | |
let newParticle: Particle; | |
// 9. 智能粒子对象池管理 | |
if (preParticleIndexes.length > 0) { | |
// 9a. 随机选择现有粒子进行复用 | |
const randomIndex = Math.floor(p5.random(preParticleIndexes.length)); | |
const index = preParticleIndexes[randomIndex]; | |
// 9b. O (1) 快速移除策略:将最后元素移到当前位置 | |
preParticleIndexes[randomIndex] = | |
preParticleIndexes[preParticleIndexes.length - 1]; | |
preParticleIndexes.pop(); | |
newParticle = allParticles[index]; | |
} else { | |
// 10. 创建新粒子 - 仅在对象池耗尽时 | |
newParticle = new Particle( | |
p5.width / 2, // 初始 x 坐标(画布中心) | |
p5.height / 2, // 初始 y 坐标(画布中心) | |
p5, | |
IS_MOBILE, | |
currentParticleConfig | |
); | |
allParticles.push(newParticle); | |
} | |
// 11. 坐标系转换与粒子移动最终位置目标设置 | |
newParticle.target.x = x + p5.width / 2 - sourceImg.width / 2; | |
newParticle.target.y = y + p5.height / 2 - sourceImg.height / 2; | |
newParticle.endColor = pixelColor; | |
} | |
} | |
// 12. 清理未分配的粒子 | |
const preLen = preParticleIndexes.length; | |
if (preLen > 0) { | |
for (let i = 0; i < preLen; i++) { | |
const index = preParticleIndexes[i]; | |
allParticles[index].kill(); // 标记为死亡状态 | |
allParticles[index].endColor = p5.color(0); // 设置为透明 | |
} | |
} | |
} |
# 2.1 像素数据结构理解
p5.js 中的 pixels 数组是一维数组,按 RGBA 顺序存储。
- 对于 100x100 的图像,数组长度为
100 * 100 * 4 = 40,000 - 索引计算:像素 (x,y) 的 R 通道位于
((y * width + x) * 4)位置
//p5.js 中的 pixels 数组是一维数组,按 RGBA 顺序存储 | |
// 对于 100x100 的图像,数组长度为 100 * 100 * 4 = 40,000 | |
// 索引计算:像素 (x,y) 的 R 通道位于 ((y * width + x) * 4) 位置 | |
const pixelIndex = (y * sourceImg.width + x) * 4; | |
const [r, g, b, a] = [ | |
sourceImg.pixels[pixelIndex], // Red | |
sourceImg.pixels[pixelIndex + 1], // Green | |
sourceImg.pixels[pixelIndex + 2], // Blue | |
sourceImg.pixels[pixelIndex + 3], // Alpha | |
]; |
# 2.2 对象池(Object Pool)模式分析
或许不应该这么叫,但是为了好懂简单这么叫先。
对象池是这个算法的性能核心,它解决了频繁创建 / 销毁对象导致的内存碎片问题。可以把对象池想象成一个 "粒子回收站":
想象你在玩积木,每次搭建新的模型时,你有两种选择:
- 浪费方式:每次都去商店买新积木,用完就扔掉(对应频繁创建新对象)
- 环保方式:把用过的积木收集起来,下次直接重复使用(对应对象池模式)
显然第二种方式更高效,这就是对象池的核心思想。
// 传统方法(性能差): | |
for (const pixel of pixels) { | |
const particle = new Particle(); // 每次都创建新对象 | |
particles.push(particle); | |
} | |
// 对象池优化方法: | |
const preParticleIndexes = allParticles.map((_, index) => index); | |
// 这创建了一个索引数组 [0, 1, 2, ..., n-1] | |
// 随机选择策略避免视觉上的规律性 | |
const randomIndex = Math.floor(p5.random(preParticleIndexes.length)); | |
const actualIndex = preParticleIndexes[randomIndex]; | |
// O (1) 移除技巧:swap and pop | |
preParticleIndexes[randomIndex] = | |
preParticleIndexes[preParticleIndexes.length - 1]; | |
preParticleIndexes.pop(); |
# 2.3 随机采样的数学原理
随机采样是控制粒子密度的核心机制。想象一下,如果我们为图像的每个像素都创建一个粒子,一张 1000x1000 的图片就会产生 100 万个粒子,这会让浏览器卡死。所以我们需要一个 "筛选机制",只选择其中一部分像素来创建粒子。
const randomThreshold = loadPercentage * resolution; | |
// 示例:loadPercentage = 0.0007, resolution = 5 | |
// randomThreshold = 0.0035 | |
// 意味着每个像素有 0.35% 的概率被选中创建粒子 | |
//p5.random (1.0) 生成 [0, 1) 的随机数 | |
// 只有当随机数 <= randomThreshold 时才创建粒子 | |
if (p5.random(1.0) > randomThreshold) continue; |
这个筛选过程就像抽奖一样:
- 每个像素都有一次 "抽奖" 机会
randomThreshold就是中奖概率,比如 0.0035 表示 0.35% 的中奖率- 如果这个像素 "中奖" 了,就为它创建一个粒子
- 如果没中奖,就跳过这个像素
举个具体例子:如果 loadPercentage 是 0.0007, resolution 是 5,那么最终的中奖率就是 0.0035(即 0.35%)。对于一张 1000x1000 的图片,理论上会创建约 3500 个粒子,这个数量既能保持视觉效果,又不会让浏览器崩溃。
这种采样策略确保:
- 密度控制:通过调整阈值控制粒子总数
- 随机分布:避免规律性的网格模式,让粒子分布看起来更自然
- 性能平衡:减少不必要的粒子创建,保持流畅的动画效果
# 2.4 坐标系转换的几何原理
坐标系转换是让图像在画布上居中显示的关键步骤。我们需要把图像坐标转换成画布坐标,这就像把一张照片贴到一块更大的画板上,需要计算贴在哪个位置才能居中。
// 图像坐标转换为画布中心坐标 | |
newParticle.target.x = x + p5.width / 2 - sourceImg.width / 2; | |
newParticle.target.y = y + p5.height / 2 - sourceImg.height / 2; | |
// 分解理解: | |
//x: 图像内的像素 x 坐标 (0 到 sourceImg.width-1) | |
//p5.width/ 2: 画布中心 x 坐标 | |
//sourceImg.width/ 2: 图像中心偏移量 | |
// 结果:将图像中心对齐到画布中心 |
让我们用一个具体例子来理解这个计算:
- 假设画布宽度是 800px,图像宽度是 200px
- 图像中某个像素的 x 坐标是 50
- 画布中心点是 400 (800/2)
- 图像中心偏移是 100 (200/2)
- 最终粒子目标位置 = 50 + 400 - 100 = 350
这样计算的结果是,图像会以画布的中心为基准点进行定位,无论图像大小如何,都能完美居中显示。
# 2.5 透明度过滤的优化价值
透明度过滤是一个简单但非常有效的优化策略。就像筛选照片时,我们会跳过那些完全空白或透明的区域一样。
if (pixelA < 128) continue; // 半透明阈值判断 |
这里的判断逻辑很简单:
pixelA是像素的透明度值,范围是 0-255- 0 表示完全透明(看不见),255 表示完全不透明(完全可见)
- 128 是中间值,我们把它作为 "有意义" 的阈值
通过跳过透明区域,我们避免了为 "看不见的地方" 创建粒子。
# 2.6 粒子生命周期管理
// 步骤 12:清理未分配的粒子 | |
const preLen = preParticleIndexes.length; | |
if (preLen > 0) { | |
for (let i = 0; i < preLen; i++) { | |
const index = preParticleIndexes[i]; | |
allParticles[index].kill(); // 触发粒子的消失动画 | |
allParticles[index].endColor = p5.color(0); // 变透明 | |
} | |
} |
这个清理步骤确保:
- 平滑过渡:粒子不会突然消失,而是逐渐淡出
- 内存优化:避免无效粒子占用计算资源
- 视觉连贯性:保持切换时的平滑视觉效果
# 3. Particle 粒子类的核心实现与 p5 函数说明
Particle 类是这个系统的核心,实现了复杂的物理模拟和视觉效果,以下是完整代码:
export class Particle { | |
p5: P5CanvasInstance<MySketchProps>; | |
// 物理属性 | |
pos: P5.Vector; // 当前位置 | |
vel: P5.Vector; // 速度向量 | |
acc: P5.Vector; // 加速度向量 | |
target: P5.Vector; // 目标位置 | |
distToTarget: number = 0; | |
// 视觉属性 | |
currentColor: P5.Color; // 当前颜色 | |
endColor: P5.Color; // 目标颜色 | |
currentSize: number; // 当前大小 | |
// 生命周期状态 | |
isKilled: boolean = false; | |
config: ParticleConfig; | |
noiseOffsetX: number; // 随机噪声偏移 X | |
noiseOffsetY: number; // 随机噪声偏移 Y | |
// 优化用的可重用向量 | |
private tempVec1: P5.Vector; | |
private tempVec2: P5.Vector; | |
private tempVec3: P5.Vector; | |
constructor( | |
x: number, | |
y: number, | |
p5: P5CanvasInstance<MySketchProps>, | |
isMobile?: boolean, | |
config?: ParticleConfig | |
) { | |
this.p5 = p5; | |
this.config = | |
config ?? | |
{ | |
/* 默认配置 */ | |
}; | |
// 初始化物理属性 | |
this.pos = new P5.Vector(x, y); | |
this.vel = new P5.Vector(0, 0); | |
this.acc = new P5.Vector(0, 0); | |
this.target = new P5.Vector(0, 0); | |
// 随机化属性增加自然感 | |
this.maxSpeed = p5.random(maxSpeedRange[0], maxSpeedRange[1]); | |
this.maxForce = p5.random(maxForceRange[0], maxForceRange[1]); | |
this.colorBlendRate = p5.random( | |
colorBlendRateRange[0], | |
colorBlendRateRange[1] | |
); | |
this.noiseOffsetX = p5.random(1000); | |
this.noiseOffsetY = p5.random(1000); | |
// 初始化可重用向量(避免频繁内存分配) | |
this.tempVec1 = new P5.Vector(); | |
this.tempVec2 = new P5.Vector(); | |
this.tempVec3 = new P5.Vector(); | |
} | |
/** | |
* 粒子运动逻辑 - 整合了寻径、噪声扰动、鼠标交互等多种物理模拟 | |
* 该方法在每一帧被调用,负责更新粒子的位置、速度和加速度 | |
*/ | |
public move() { | |
const p5 = this.p5; | |
const { closeEnoughTarget, speed, scaleRatio, mouseSize } = this.config; | |
// 1. 添加 Perlin 噪声扰动,让粒子运动更自然 | |
const noiseScale = this.config.noiseScale ?? 0.005; | |
const noiseStrength = this.config.noiseStrength ?? 0.6; | |
this.tempVec1.set( | |
p5.noise( | |
this.noiseOffsetX + this.pos.x * noiseScale, | |
this.pos.y * noiseScale | |
) * | |
noiseStrength - | |
noiseStrength / 2, | |
p5.noise( | |
this.noiseOffsetY + this.pos.y * noiseScale, | |
this.pos.x * noiseScale | |
) * | |
noiseStrength - | |
noiseStrength / 2 | |
); | |
this.acc.add(this.tempVec1); | |
// 2. 计算到目标的距离(寻径行为核心) | |
const dx = this.target.x - this.pos.x; | |
const dy = this.target.y - this.pos.y; | |
const distSq = dx * dx + dy * dy; | |
this.distToTarget = Math.sqrt(distSq); | |
// 3. 接近减速机制 - 防止粒子在目标位置震荡 | |
let proximityMult = 1; | |
if (this.distToTarget < closeEnoughTarget) { | |
proximityMult = this.distToTarget / closeEnoughTarget; | |
this.vel.mult(0.9); // 强阻尼,快速稳定 | |
} else { | |
this.vel.mult(0.95); // 轻阻尼,保持流畅运动 | |
} | |
// 4. 朝向目标的寻径力 | |
if (distSq > 1) { | |
this.tempVec2.set(this.target.x - this.pos.x, this.target.y - this.pos.y); | |
this.tempVec2.normalize(); | |
this.tempVec2.mult(this.maxSpeed * proximityMult * speed); | |
this.acc.add(this.tempVec2); | |
} | |
// 5. 鼠标交互系统 | |
const scaledMouseX = p5.mouseX / scaleRatio; // 这里是因为图像 scale 了,鼠标位置也需要 | |
const scaledMouseY = p5.mouseY / scaleRatio; | |
const mouseDx = scaledMouseX - this.pos.x; | |
const mouseDy = scaledMouseY - this.pos.y; | |
const mouseDistSq = mouseDx * mouseDx + mouseDy * mouseDy; | |
if (mouseDistSq < mouseSize * mouseSize) { | |
const mouseDist = Math.sqrt(mouseDistSq); | |
if (p5.mouseIsPressed) { | |
// 鼠标按下:吸引粒子 | |
this.tempVec3.set(mouseDx, mouseDy); | |
} else { | |
// 鼠标悬停:排斥粒子 | |
this.tempVec3.set(-mouseDx, -mouseDy); | |
} | |
this.tempVec3.normalize(); | |
this.tempVec3.mult((mouseSize - mouseDist) * 0.05); | |
this.acc.add(this.tempVec3); | |
} | |
// 6. 应用物理更新:加速度→速度→位置 | |
this.vel.add(this.acc); | |
this.vel.limit(this.maxForce * speed); | |
this.pos.add(this.vel); | |
this.acc.mult(0); // 重置加速度,为下一帧准备 | |
// 7. 更新噪声偏移,保持噪声的连续性 | |
this.noiseOffsetX += 0.01; | |
this.noiseOffsetY += 0.01; | |
} | |
/** | |
* 粒子渲染逻辑 - 处理颜色过渡、大小变化和最终绘制 | |
* 该方法负责粒子的视觉表现,包括颜色插值和大小映射 | |
*/ | |
public draw() { | |
const p5 = this.p5; | |
const { closeEnoughTarget, particleSize } = this.config; | |
// 1. 颜色平滑过渡 - 使用线性插值实现自然的颜色变化 | |
this.currentColor = p5.lerpColor( | |
this.currentColor, | |
this.endColor, | |
this.colorBlendRate | |
); | |
p5.stroke(this.currentColor); | |
// 2. 基于距离的动态大小计算 | |
let targetSize = 2; // 默认最小大小 | |
if (!this.isKilled) { | |
// 距离目标越近,粒子越大,营造 "到达感" | |
targetSize = p5.map( | |
p5.min(this.distToTarget, closeEnoughTarget), | |
closeEnoughTarget, | |
0, | |
0, | |
particleSize | |
); | |
} | |
// 3. 大小平滑过渡 - 避免突变,保持视觉连贯性 | |
this.currentSize = p5.lerp(this.currentSize, targetSize, 0.1); | |
// 4. 设置绘制属性并渲染粒子 | |
p5.strokeWeight(this.currentSize); | |
p5.point(this.pos.x, this.pos.y); // 以点的形式绘制粒子 | |
} | |
// 边界检测 - 超出屏幕的粒子标记为死亡 | |
public isOutOfBounds(): boolean { | |
const margin = 50; | |
return ( | |
this.pos.x < -margin || | |
this.pos.x > this.p5.width + margin || | |
this.pos.y < -margin || | |
this.pos.y > this.p5.height + margin | |
); | |
} | |
// 粒子的回收清理 | |
public kill(): void {} | |
} |
# p5.js 函数说明
在进行分步讲解之前,让我们先简单了解一下几个关键的 p5.js 函数:
p5.lerpColor() - 颜色线性插值
颜色插值就像调色板上混合颜料的过程。想象你要从红色慢慢变成蓝色, lerpColor 就能帮你计算中间的所有过渡颜色。
// 语法:lerpColor (c1, c2, amt) | |
// 在两个颜色之间进行线性插值 | |
//amt: 0-1 之间的值,0 返回 c1,1 返回 c2 | |
this.currentColor = p5.lerpColor( | |
this.currentColor, | |
this.endColor, | |
this.colorBlendRate | |
); |
比如从红色到蓝色:
amt = 0:完全是红色amt = 0.5:红蓝混合的紫色amt = 1:完全是蓝色
p5.noise() - Perlin 噪声生成
Perlin 噪声可以想象成自然界的随机性,比如云彩的形状、水波的纹理。它不是完全随机的,而是有一定规律的 "自然随机"。
// 语法:noise (x, [y], [z]) | |
// 生成连续的伪随机噪声值 | |
const noiseValue = p5.noise( | |
this.noiseOffsetX + this.pos.x * noiseScale, | |
this.pos.y * noiseScale | |
); |
这让粒子的运动看起来更像自然现象,而不是僵硬的机械运动。
p5.map() - 数值映射
map 函数就像一个比例尺转换器。比如你想把摄氏温度转换成华氏温度,或者把 0-100 的分数转换成 A-F 的等级。
// 语法:map (value, start1, stop1, start2, stop2) | |
// 将值从一个范围映射到另一个范围 | |
targetSize = p5.map( | |
p5.min(this.distToTarget, closeEnoughTarget), | |
closeEnoughTarget, | |
0, | |
0, | |
particleSize | |
); |
举例:上面的代码把距离转换成粒子大小
- 距离很远时,粒子很小
- 距离很近时,粒子很大
map函数自动计算中间的比例
P5.Vector - 向量运算
// 创建向量 | |
const vel = new P5.Vector(x, y); | |
// 向量运算 | |
vel.normalize(); // 标准化:保持方向,长度变成 1 | |
vel.mult(magnitude); // 缩放:改变长度,保持方向 | |
vel.add(otherVector); // 相加:两个力的合成 | |
vel.limit(maxMag); // 限制大小:不让速度太快 |
就像物理学中的力的合成:如果一个粒子同时受到向右的力和向上的力,最终的运动方向就是这两个力的合成结果。
接下来分步进行讲解。
# 4. 粒子运动逻辑 move
粒子的运动系统结合了多种物理模拟技术:
# 4.1 寻径行为(Seek Behavior)
/** | |
* 粒子运动逻辑 - 整合了寻径、噪声扰动、鼠标交互等多种物理模拟 | |
* 该方法在每一帧被调用,负责更新粒子的位置、速度和加速度 | |
*/ | |
public move() { | |
const p5 = this.p5; | |
const { closeEnoughTarget, speed, scaleRatio, mouseSize } = this.config; | |
// 1. 添加 Perlin 噪声扰动,让粒子运动更自然 | |
const noiseScale = this.config.noiseScale ?? 0.005; | |
const noiseStrength = this.config.noiseStrength ?? 0.6; | |
this.tempVec1.set( | |
p5.noise( | |
this.noiseOffsetX + this.pos.x * noiseScale, | |
this.pos.y * noiseScale | |
) * | |
noiseStrength - | |
noiseStrength / 2, | |
p5.noise( | |
this.noiseOffsetY + this.pos.y * noiseScale, | |
this.pos.x * noiseScale | |
) * | |
noiseStrength - | |
noiseStrength / 2 | |
); | |
this.acc.add(this.tempVec1); | |
// 2. 计算到目标的距离(寻径行为核心) | |
const dx = this.target.x - this.pos.x; | |
const dy = this.target.y - this.pos.y; | |
const distSq = dx * dx + dy * dy; | |
this.distToTarget = Math.sqrt(distSq); | |
// 3. 接近减速机制 - 防止粒子在目标位置震荡 | |
let proximityMult = 1; | |
if (this.distToTarget < closeEnoughTarget) { | |
proximityMult = this.distToTarget / closeEnoughTarget; | |
this.vel.mult(0.9); // 强阻尼,快速稳定 | |
} else { | |
this.vel.mult(0.95); // 轻阻尼,保持流畅运动 | |
} | |
// 4. 朝向目标的寻径力 | |
if (distSq > 1) { | |
this.tempVec2.set(this.target.x - this.pos.x, this.target.y - this.pos.y); | |
this.tempVec2.normalize(); | |
this.tempVec2.mult(this.maxSpeed * proximityMult * speed); | |
this.acc.add(this.tempVec2); | |
} | |
// 5. 鼠标交互系统 | |
const scaledMouseX = p5.mouseX / scaleRatio; // 这里是因为图像 scale 了,鼠标位置也需要 | |
const scaledMouseY = p5.mouseY / scaleRatio; | |
const mouseDx = scaledMouseX - this.pos.x; | |
const mouseDy = scaledMouseY - this.pos.y; | |
const mouseDistSq = mouseDx * mouseDx + mouseDy * mouseDy; | |
if (mouseDistSq < mouseSize * mouseSize) { | |
const mouseDist = Math.sqrt(mouseDistSq); | |
if (p5.mouseIsPressed) { | |
// 鼠标按下:吸引粒子 | |
this.tempVec3.set(mouseDx, mouseDy); | |
} else { | |
// 鼠标悬停:排斥粒子 | |
this.tempVec3.set(-mouseDx, -mouseDy); | |
} | |
this.tempVec3.normalize(); | |
this.tempVec3.mult((mouseSize - mouseDist) * 0.05); | |
this.acc.add(this.tempVec3); | |
} | |
// 6. 应用物理更新:加速度→速度→位置 | |
this.vel.add(this.acc); | |
this.vel.limit(this.maxForce * speed); | |
this.pos.add(this.vel); | |
this.acc.mult(0); // 重置加速度,为下一帧准备 | |
// 7. 更新噪声偏移,保持噪声的连续性 | |
this.noiseOffsetX += 0.01; | |
this.noiseOffsetY += 0.01; | |
} |
- Perlin 噪声扰动力详解:
Perlin 噪声(柏林噪声)是计算机图形学中最重要的算法之一,由 Ken Perlin 在 1983 年发明,专门用于生成自然感的随机纹理和运动。在我们的粒子系统中,它的作用是让粒子的运动路径更加自然,避免过于机械化的直线运动。
// 1. 噪声偏移的作用 | |
this.noiseOffsetX = p5.random(1000); // 为每个粒子生成唯一的噪声起始点 | |
this.noiseOffsetY = p5.random(1000); | |
// 2. 2D Perlin 噪声生成自然随机力 | |
const noiseForceX = | |
p5.noise(this.noiseOffsetX + this.pos.x * 0.005, this.pos.y * 0.005) * 0.6 - | |
0.3; | |
const noiseForceY = | |
p5.noise(this.noiseOffsetY + this.pos.y * 0.005, this.pos.x * 0.005) * 0.6 - | |
0.3; | |
// 3. 噪声偏移的更新(模拟时间流逝) | |
this.noiseOffsetX += 0.01; | |
this.noiseOffsetY += 0.01; |
为什么需要噪声偏移(Noise Offset)?
想象一下,如果所有粒子都使用相同的噪声函数:
// ❌ 错误做法:所有粒子使用相同的噪声 | |
const force = p5.noise(this.pos.x * 0.005, this.pos.y * 0.005); |
这会导致所有位于相同坐标的粒子受到完全相同的力,产生 "同步化" 运动,看起来很不自然。
通过为每个粒子分配不同的 noiseOffset ,我们实际上是在噪声空间中为每个粒子 "分配" 了不同的起始位置:
// ✅ 正确做法:每个粒子有独特的噪声偏移 | |
// 粒子 A: offset = 123.45 | |
const forceA = p5.noise(123.45 + this.pos.x * 0.005, this.pos.y * 0.005); | |
// 粒子 B: offset = 987.65 | |
const forceB = p5.noise(987.65 + this.pos.x * 0.005, this.pos.y * 0.005); |
噪声参数详解:
noiseScale = 0.005(噪声缩放因子)- 控制噪声的 "粗糙度" 或 "频率"
- 值越小,噪声变化越平滑,粒子运动越柔和
- 值越大,噪声变化越剧烈,粒子运动越随机
// 平滑运动(大尺度噪声) | |
const smoothForce = p5.noise(x * 0.001, y * 0.001); | |
// 剧烈运动(小尺度噪声) | |
const chaoticForce = p5.noise(x * 0.02, y * 0.02); |
noiseStrength = 0.6(噪声强度)- 控制噪声力的最大幅度
- 通过
* 0.6 - 0.3将 [0,1] 映射到 [-0.3, 0.3] - 这样粒子可以向任意方向受力
时间维度的噪声
- 通过每帧增加
noiseOffset += 0.01,我们模拟了时间的流逝 - 这让噪声场随时间缓慢变化,产生 "风场" 效果
- 通过每帧增加
噪声的视觉效果对比:
// 无噪声:粒子直接移向目标,路径僵硬 | |
const force = target.sub(position).normalize().mult(speed); | |
// 有噪声:粒子在移向目标的同时受到 "风力" 影响,路径自然 | |
const seekForce = target.sub(position).normalize().mult(speed); | |
const noiseForce = calculatePerlinNoise(position, time); | |
const totalForce = seekForce.add(noiseForce); |
- 噪声值范围 [0,1],通过
* 0.6 - 0.3转换为 [-0.3, 0.3] 的双向力 - 使用位置坐标作为噪声输入,确保相邻粒子的力相似但不完全相同
- 噪声偏移为每个粒子创建独特的 "风场" 体验,避免同步化运动
- 阻尼系数物理意义:
vel.mult(0.9):强阻尼,模拟粘稠介质中的运动vel.mult(0.95):轻阻尼,模拟空气阻力- 阻尼防止粒子震荡,确保稳定收敛到目标位置
- 力的叠加原理:
F_total = F_seek + F_noise + F_mouse
this.acc.add(seekForce); // 寻径力 | |
this.acc.add(noiseForce); // 噪声扰动力 | |
this.acc.add(mouseForce); // 鼠标交互力 |
# 4.2 鼠标交互系统
// 鼠标交互逻辑 | |
const scaledMouseX = p5.mouseX / scaleRatio; | |
const scaledMouseY = p5.mouseY / scaleRatio; | |
// 使用平方距离比较(避免开方运算) | |
const mouseDx = scaledMouseX - this.pos.x; | |
const mouseDy = scaledMouseY - this.pos.y; | |
const mouseDistSq = mouseDx * mouseDx + mouseDy * mouseDy; | |
const mouseSizeSq = mouseSize * mouseSize; | |
if (mouseDistSq < mouseSizeSq) { | |
const mouseDist = Math.sqrt(mouseDistSq); // 只在需要时计算开方 | |
if (p5.mouseIsPressed) { | |
// 按下鼠标:吸引粒子 | |
this.tempVec3.set(mouseDx, mouseDy); | |
} else { | |
// 鼠标悬停:排斥粒子 | |
this.tempVec3.set(-mouseDx, -mouseDy); | |
} | |
this.tempVec3.normalize(); | |
this.tempVec3.mult((mouseSize - mouseDist) * 0.05); | |
this.acc.add(this.tempVec3); | |
} | |
// 应用物理更新 | |
this.vel.add(this.acc); | |
this.vel.limit(this.maxForce * speed); | |
this.pos.add(this.vel); | |
this.acc.mult(0); // 重置加速度 |
# 5. 粒子渲染 draw
public draw() { | |
const p5 = this.p5; | |
const { closeEnoughTarget, particleSize } = this.config; | |
// 平滑颜色过渡 | |
this.currentColor = p5.lerpColor( | |
this.currentColor, | |
this.endColor, | |
this.colorBlendRate | |
); | |
p5.stroke(this.currentColor); | |
// 基于距离的大小计算 | |
let targetSize = 2; | |
if (!this.isKilled) { | |
targetSize = p5.map( | |
p5.min(this.distToTarget, closeEnoughTarget), | |
closeEnoughTarget, | |
0, | |
0, | |
particleSize | |
); | |
} | |
// 平滑大小过渡 | |
this.currentSize = p5.lerp(this.currentSize, targetSize, 0.1); | |
p5.strokeWeight(this.currentSize); | |
p5.point(this.pos.x, this.pos.y); | |
} |
# 6. 主渲染循环:p5.draw 的实现
p5.js 在 draw 中绘制每一帧,这个函数会不停地重复执行,类似 requestAnimationFrame (通常是 60FPS),更新所有粒子的状态并进行渲染。
/** | |
* 主渲染循环 - 每帧执行一次的核心函数 | |
* 负责粒子更新、渲染和内存管理 | |
*/ | |
p5.draw = () => { | |
// 1. 早期返回优化 - 避免无效计算 | |
if (!(activeAnim && allParticles?.length)) { | |
return; // 动画未激活或无粒子时直接返回 | |
} | |
// 2. 清除上一帧的画布内容 | |
p5.clear(); | |
// 3. 双指针算法实现活跃粒子压缩 | |
let writeIndex = 0; // 写指针:指向下一个活跃粒子应存放的位置 | |
// 4. 遍历所有粒子,同时进行更新和生命周期管理 | |
for (let readIndex = 0; readIndex < allParticles.length; readIndex++) { | |
const particle = allParticles[readIndex]; | |
// 5. 执行粒子的物理更新和渲染 | |
particle.move(); // 更新位置、速度、加速度 | |
particle.draw(); // 渲染到画布 | |
// 6. 生命周期检查和数组压缩 | |
if (!(particle.isKilled || particle.isOutOfBounds())) { | |
// 粒子仍然活跃,需要保留 | |
if (writeIndex !== readIndex) { | |
// 只有当位置不同时才进行赋值(避免自赋值) | |
allParticles[writeIndex] = allParticles[readIndex]; | |
} | |
writeIndex++; // 写指针前移 | |
} | |
// 注意:死亡粒子会被自动跳过,不会被复制到新位置 | |
} | |
// 7. 数组截断 - 移除末尾的死亡粒子引用 | |
allParticles.length = writeIndex; | |
}; |
之所以换成双指针,是因为原代码的死亡粒子清理方法效率很低:
- 当数组前面没有死亡粒子时,
writeIndex === readIndex - 此时赋值操作
a[i] = a[i]是冗余的,可以跳过 - 在粒子密集场景下,这个优化能减少大量无效操作
// ❌ 原代码:每次删除都要移动大量元素 | |
for (let i = allParticles.length - 1; i >= 0; i--) { | |
if (allParticles[i].isKilled) { | |
allParticles.splice(i, 1); | |
} | |
} | |
// ✅ 双指针:单次遍历完成删除,O (n) 复杂度 | |
let writeIndex = 0; | |
for (let readIndex = 0; readIndex < allParticles.length; readIndex++) { | |
if (!allParticles[readIndex].isKilled) { | |
allParticles[writeIndex++] = allParticles[readIndex]; | |
} | |
} | |
allParticles.length = writeIndex; |
# p5 在 React 中的使用
原代码该实现的都实现了,但是在 react 中接入的话,那显然还是在 react 中进行比较好,下面是迁移到 react 中的实践记录:
# 1. 技术选型:@p5-wrapper/react
在 React 中集成 p5.js 有多种方案,最终选择了 @p5-wrapper/react 库,主要是因为该有的他都有:
- TypeScript 支持:完整的类型定义,开发体验佳
- React 生命周期集成:自动处理组件挂载 / 卸载
- Props 响应式更新:支持通过
updateWithProps实时更新 sketch 参数
pnpm i @p5-wrapper/react p5 | |
pnpm i -D @types/p5 |
# 2. 组件架构设计
# 2.1 核心组件结构
// 类型定义 | |
export type MySketchProps = SketchProps & { | |
activeAnim: boolean; // 动画开关 | |
imageIdx: number; // 当前图像索引 | |
id?: string; // DOM 容器 ID | |
particleConfig?: ParticleConfig; // 粒子配置 | |
}; | |
// 主组件 | |
export const DynamicParticleGL = ({ | |
activeAnim, | |
imageIdx, | |
id = "particle-container", | |
getSourceImgInfos, | |
particleConfig, | |
}: DynamicParticleGLProps) => { | |
// 使用 useMemo 缓存 sketch 函数,避免重复创建 | |
const wrappedSketch = useMemo(() => { | |
return function sketch(p5: P5CanvasInstance<MySketchProps>) { | |
//sketch 实现... | |
}; | |
}, [getSourceImgInfos]); | |
return ( | |
<ReactP5Wrapper | |
sketch={wrappedSketch} | |
activeAnim={activeAnim} | |
imageIdx={imageIdx} | |
id={id} | |
particleConfig={particleConfig} | |
/> | |
); | |
}; |
# 2.2 Sketch 函数的 React 化改造
原生 p5.js 写法:
function sketch(p5) { | |
p5.setup = () => { | |
/* ... */ | |
}; | |
p5.draw = () => { | |
/* ... */ | |
}; | |
} |
React 包装后的写法:
function sketch(p5: P5CanvasInstance<MySketchProps>) { | |
// 状态变量 | |
let activeAnim = false; | |
let canvas: P5.Renderer; | |
const allParticles: Array<Particle> = []; | |
// 响应 React props 变化 | |
p5.updateWithProps = (props) => { | |
activeAnim = props.activeAnim ?? false; | |
setImageIdx(props?.imageIdx || 0); | |
// 动态配置更新 | |
if (props.particleConfig) { | |
Object.assign(currentParticleConfig, props.particleConfig); | |
} | |
// DOM 容器动态绑定 | |
if (canvas && props.id) { | |
canvas.parent(props.id); | |
} | |
}; | |
p5.preload = () => { | |
/* 图像预加载 */ | |
}; | |
p5.setup = () => { | |
/* 初始化设置 */ | |
}; | |
p5.draw = () => { | |
/* 渲染循环 */ | |
}; | |
} |
# 3. Props 驱动的状态更新
// 在演示组件中 | |
const [active, setActive] = useState(true); | |
const [imageIdx, setImageIdx] = useState(0); | |
// 实时配置更新(使用 Leva 控制面板) | |
const particleControls = useControls("Particle System", { | |
particleSize: { value: isMobile ? 4 : 5, min: 1, max: 20, step: 1 }, | |
speed: { value: 3, min: 0.1, max: 10, step: 0.1 }, | |
//... 更多配置项 | |
}); | |
// 配置转换 | |
const particleConfig = { | |
closeEnoughTarget: particleControls.closeEnoughTarget, | |
speed: particleControls.speed, | |
maxSpeedRange: [ | |
particleControls.maxSpeedMin, | |
particleControls.maxSpeedMax, | |
] as [number, number], | |
//... 其他配置项映射 | |
}; |
# 4. useMemo 缓存 Sketch 函数
// 避免每次渲染都重新创建 sketch 函数 | |
const wrappedSketch = useMemo(() => { | |
return function sketch(p5: P5CanvasInstance<MySketchProps>) { | |
//sketch 实现 | |
}; | |
}, [getSourceImgInfos]); // 只有当图像源配置变化时才重新创建 |
# 5. TypeScript 类型安全
# 5.1 完整的类型定义
// 粒子配置类型 | |
export type ParticleConfig = { | |
closeEnoughTarget: number; | |
speed: number; | |
mouseSize: number; | |
scaleRatio: number; | |
particleSize: number; | |
maxSpeedRange?: [number, number]; | |
maxForceRange?: [number, number]; | |
colorBlendRate?: [number, number]; | |
noiseScale?: number; | |
noiseStrength?: number; | |
}; | |
// 图像源配置类型 | |
type SourceImageInfo = { | |
url: string; | |
scaleNum?: number; | |
resize?: [number, number]; | |
loadPercentage?: number; | |
resolution?: number; | |
}; | |
// 组件 Props 类型 | |
interface DynamicParticleGLProps { | |
activeAnim?: boolean; | |
imageIdx: number; | |
id?: string; | |
getSourceImgInfos?: (isMobile: boolean) => SourceImageInfo[]; | |
particleConfig?: ParticleConfig; | |
} |
# 5.2 P5 实例类型扩展
// 扩展 P5 实例类型,支持自定义 props | |
export type MySketchProps = SketchProps & { | |
activeAnim: boolean; | |
imageIdx: number; | |
id?: string; | |
particleConfig?: ParticleConfig; | |
}; | |
// 在 sketch 函数中使用强类型 | |
function sketch(p5: P5CanvasInstance<MySketchProps>) { | |
p5.updateWithProps = (props: MySketchProps) => { | |
// TypeScript 会提供完整的类型提示和检查 | |
activeAnim = props.activeAnim ?? false; | |
setImageIdx(props.imageIdx || 0); | |
}; | |
} |
这种集成方式既保留了 p5.js 强大的图形处理能力,又充分利用了 React 的组件化和状态管理优势,为构建复杂的交互式可视化应用提供了可靠的技术基础。
# 应用场景与示例
虽然粒子效果的性能目前还是十分堪忧,不建议在要求性能的场景下使用,适合展示型的网页。
能想到的应用场景大概有:
- 作为企业品牌 Logo 的动态展示
- 作为轮播 Logo 等的背景
- 作为背景加上一层遮罩
# Refs
p5.js 官方文档
Particles to Image - 原始 OpenProcessing 作品
Understanding Perlin Noise - Adrian Biagioli 的 Perlin 噪声详解,包含可视化示例
p5.js noise () 函数文档 - p5.js 噪声函数的官方文档
Perlin Noise Explained Visually - 可视化解释 Perlin 噪声算法
Force-based Particle Systems - 自主代理(Autonomous Agents)
@p5-wrapper/react 文档 - p5.js React 包装器
本文随时修订中,有错漏可直接评论